Turn an ugly fixer-upper piece of furniture into a bold and beautiful addition to your living room!
I made a big move and had to get rid of a lot of my stuff, which meant getting new stuff at a good price. I found this coffee table at the goodwill for $5, but it was really ugly. I wish I had a “before” picture! My friend and I decided it was a craft just waiting to happen! I had always wanted to try Chevrons, and this was the perfect opportunity!
Here’s what you’ll need:
- A fixer-upper table (or other piece of furniture)
- A sander and matching sand paper
- Sand paper for the little cracks a sander can’t get to
- Blue tape. I got 2-inch tape, but you can choose whichever size you like. The smaller the tape the smaller the chevron.
- Spray paint in two colors of your choice (I went with taupe and white)
- A clear coat spray paint. I got one that would be water resistant, so I could set cups on there without worrying.
Directions:
 The table I started with had peeling varnish on it. You want to make sure you sand that off so the spray paint sticks. Sanding was the most time-consuming part. I don’t have a sander, but luckily my move brought me closer to my parents place. My dad loaned me his sander, which saved a lot of time! There will be little cracks and curves and crannies that you’ll have to use sand paper for, though.
- Once it is all sanded down, you’ll want to spray it with your base color. My base color was white. Spray from far away to get a nice even finish.
- Now to lay down your blue tape. This is the tricky part. You’ll notice that my chevrons are not perfect. That is because I perfected the art after I started. What you’ll want to do is measure out pieces of tape to be the exact same size. 5 inches is what I ended up going with. Then, as you go along, you’ll lay down each piece of tape corner-to-corner so they overlap and leave a perfect angle.
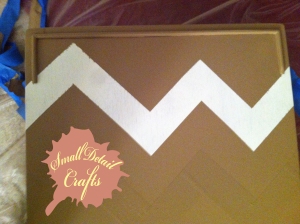
- Take a credit card and carefully smooth down all edges of your tape so the paint won’t bleed. (In the picture to the right you can see that the left upper corner didn’t get smoothed down enough and the paint bled a little.)
- Tape off everything else you don’t want to get your secondary color on – sides, legs, etc.
- Spray your secondary color. In my case, this was the taupe/brown color I chose.
- Once everything has dried, carefully peel off the tape.
- Now you’re ready to spray on your clear coat. I wanted to make sure my table was well-protected, so I put on two coats.
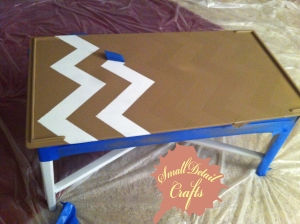


Viola! You now have a beautifully redone table (or other piece of furniture) that you can be proud to show to company!
This was simple once you got past the “how do I lay down the tape?” part. The most fun was peeling off all the paint to reveal the chevrons!
Have fun, and please comment with your trials and errors below, I would love to see what you come up with in terms of colors and different furniture pieces! The possibilities are endless!
DIY Spray Paint Chevron Table
<3, Laina & Small Detail Crafts
Want to know about more fun crafts and upcycling projects like this? Visit my Pinterest!
Do you enjoy cooking as much as crafting? Check out Small Detail Food for some appetizing recipes!